KALI – How to install OpenVPN for Linux – The Visual Guide
How to install OpenVPN on Kali.Step 1 – Download OpenVPN
Open a Root Terminal and install these 7 packages:
apt-get install network-manager-openvpn
apt-get install network-manager-openvpn-gnome
apt-get install network-manager-pptp
apt-get install network-manager-pptp-gnome
apt-get install network-manager-strongswan
apt-get install network-manager-vpnc
apt-get install network-manager-vpnc-gnome
******
Step 2 - Download OpenVPN certificates
Using IVPN as a provider we need:www.ivpn.net
- User name (always starts with iVPN)- Password
- 2 Certificates and 1 Key
- Multiple routes called .ovpn files
With IVPN, these .ovpn files are under
Download Tab
Configuration files (Windows, OSX and Linux)
Save file

Zipped file is saved to /tmp

*******
Step 3a – Make a VPN directory to keep things ordered
(Trust me on this… you’ll be so glad)*****
mkdir iVPN
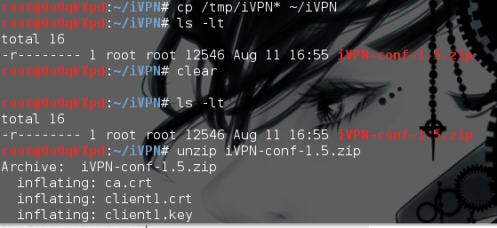
cp /tmp/iVPN* ~/iVPN

check that it’s copied over fine…before unzipping.
*****
Step 3b – Extract the zipped VPN files
unzip iVPN-conf-1.5.zip
Notice the names of the files unzipped…*****
There are 3 critical OpenVPN files that you’ll need to be able to locate.
ca.crt = certificate authority certificate
client1.crt = client certificate (ie your certificate)
client1.key = client key (ie your key)
******
.ovpn are configuration files that contain the route files, IP’s of the gateways etc.
They specify routes such as direct to Netherlands, or Multihop, USA to UK.As the files are unzipped, you’ll see many single or multi hop routes appear.

*******
Step 4 – Import your VPN routes into Network Manager
Click on Network Icon (next to Root – Top Right hand corner)
Scroll down
VPN Connections - (towards end of page)
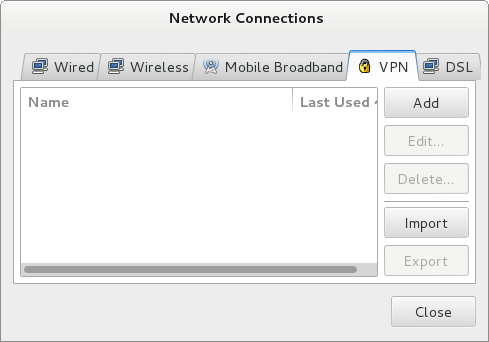
Configure VPN
IMPORT Button
IMPORT > Browse to Netherlands.ovpn file
Remember why we saved all the files under /iVPN… so that we could easily locate them…OPEN Button

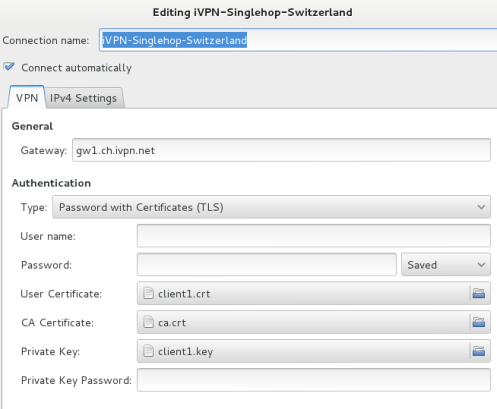
The .ovpn will recognise the Netherlands gateway, your Authentication type is “Passwords with Certificates (TLS)”
Just fill in your user id and password.Leave Private Key Password BLANK – don’t fill this in.
Save
******
Step 5 – Fill in your User Name and password

*****
Step 6 – Test the VPN
1. Click the Network Icon next to Root.
2. VPN Connections – and all your VPN routes will be displayed.
3. Connect and ensure that you’ve used the right password etc.
VPN Login Message will confirm you’ve connected
******
Step 7 – Now import the other .ovpn files
1. Select Network Icon > VPN Connections > Configure VPN
2. Import > .ovpn for your route eg Switzerland.ovpn > password form will start
It will be headed iVPN – Switzerland
3. Now fill in your username and password (but not the private key password – leave this blank).
4. Save

That’s it!! You have multiple VPN routes configured.
*******
Step 8 – TEST for a Tunnel connection
ifconfig
tun0 connection will be listed

*****
IVPN – Test of OpenVPN connection
This is the connection speed you should be expecting.www.ivpn.net
OpenVPN works on Android, Mac, Linux as well as Windows.
*****
Good to do – Check your repo source files are fully configured
update your sources list (/etc/apt/source.list)cd /etc/apt
ls -lt
Look for a file called sources.list
gedit sources.list
add this line to the file and save:deb http://ftp.de.debian.org/debian wheezy main

Now update all the repo’s.
## Security updates
deb http://security.kali.org/kali-security kali/updates main contrib non-free
deb http://ftp.uk.debian.org/debian stable main contrib
deb-src http://ftp.uk.debian.org/debian stable main contrib
deb http://http.kali.org/ /kali main contrib non-free
deb http://http.kali.org/ /wheezy main contrib non-free
deb http://http.kali.org/kali kali-dev main contrib non-free
deb http://http.kali.org/kali kali-dev main/debian-installer
deb-src http://http.kali.org/kali kali-dev main contrib non-free
deb http://http.kali.org/kali kali main contrib non-free
deb-src http://http.kali.org/kali kali main contrib non-free
deb http://repo.kali.org/kali kali-bleeding-edge main
deb http://ftp.de.debian.org/debian wheezy main
******

Post a Comment